One inbox to rule them all
Like most people, I have quite a few email addresses spread across multiple domains. The email addresses are a mix of personal, business, and organizational. Obviously checking multiple email addresses multiple times a day is a huge time sink. Over the past few years I've developed a workflow that makes the most of the time I have to spend on email. What follows is the system I've devised that funnels all of my email through one gmail account (and don't worry - people who send email to/receive email from me can't see it from the outside), with daily local backups using Mail.app (OSX).
Email addresses
Make a list of all of your email addresses, along with any attributes that differentiate them from one another. Is there a hierarchy of importance? My list (in order of importance) is comprised of one personal (gmail) account, two business (google apps) accounts, one alternate personal (gmail) account, and three organizational (various webmail) accounts. The first step is to set these up to so they'll end up in the gmail account that you want to handle all of your email from.
Note: From this point on, "Main gmail account" refers to the account that will become your default inbox. "Non-main email account" refers to the email address that will have emails funneling to the default inbox.
Gmail and Google Apps accounts
Forward your emails to your main account
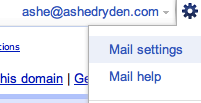
 Login to the non-main gmail account. In the upper right hand corner, click on the little gear and then on Mail Settings. Click on Forwarding and POP/IMAP.
  Click the Add a forwarding address button. This will allow you to enter the main gmail account where all of your emails are going to. A confirmation email will be sent to the email address you entered and you will need to either click the link in that email, or enter the verification code to allow it to start forwarding.
  Once it has been verified, you can choose your forwarding options. I set mine to be archived once they are forwarded on, but this is your own preference.
Allow your main account to send email as if it were coming from the other addresses
 When you are finished forwarding your email accounts, login to your main gmail account. Using the same menu in the upper right, click Mail Settings and go to the Accounts and Import tab. In the Send Mail As section, add each email account by clicking the Send mail from another address button. It will ask you for the name that will be printed with the email address and the email address itself. After clicking the Next Step button, an email will be sent to the email address you entered with a verification code that you will need to enter as you did before. Next, select "Reply from the same address the message was sent to" from the radio buttons below the email addresses you entered. This will set the "from" address, by default, to be the address the person sent you an email to. The nice thing is that there will be a drop down box above the email that allows you to change it for that specific email if you like.
Non-gmail accounts
As there are a number of different email services and types, I would recommend reading Moving mail from another account to Gmail, Get mail from other accounts, or googling the best method to forward the emails to gmail. In many cases, it's very straightforward and uses the same general concepts as above.
Labels and Filters
I have a very large list of both labels and filters that make it easy for me to find and manage messages quickly and easily. 
Labels
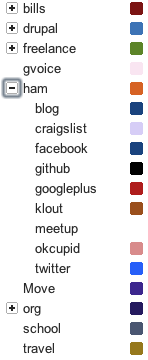
If you haven't used the label system in Gmail, think of them as tags. You can have as many or as few labels as you want on each email. The first labels you will want to set up are email address-specific ones: mine are named after the account it comes from (the business name, or organization name), but you can name them in any way that makes it easy to differentiate them. As gmail allows for nested labels, any additional labels I create I will nest below the appropriate email address. If the label isn't email address-specific, I nest them by category. For instance, I have a "ham" label and below that are labels for various social networks that send me automated emails.
Filters
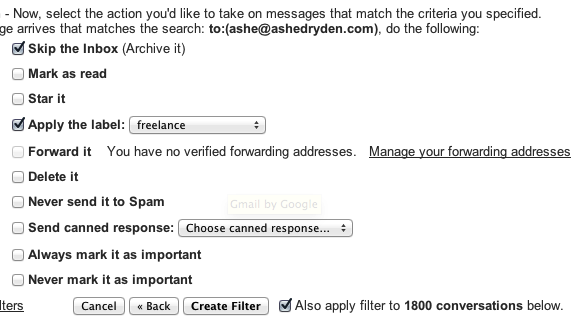
Filters allow you to find emails that meet certain criteria and apply an action on them. The important thing to remember is that, once a filter is set up, it only commits the action upon receiving an email. The first filters I set up apply the email address-specific labels and look like this: 
 Note that I have it skip the inbox by default. We'll get back to that in the Multiple Inboxes section. Some other useful filters to set up: emails coming from social network sites, mailing lists, specific domains (I have a label set up for each client, for instance), or mentioning specific words.
Note: If you had labels and filters already set up in your non-main gmail and google apps accounts, there is an import/export feature in Labs. You will need to edit the filters to include "To: [email address the email is sent to]" for them to work properly.
Mail Settings
There are a few settings we'll want to change. They may seem kind of out of order, but Labs changes some of the settings options, so we will want to go there first.
Tab: Labs
In labs, enable the following:
- Background Send - Sends email in the background, so you don't have to wait on the page, you can move on to more important things.
- Canned Responses - allows you to send a pre-written responses to an email. Great if you get the same question frequently or find yourself writing similar emails regularly.
- Default 'Reply to all' - this isn't mandatory, but helps with the "damn, I only replied to one person on that email thread" problem.
- Inbox Preview - if you're antsy like me, this will allow you to get a preview of what is in your inbox while gmail is loading.
- Mark as read button - this is a time saver; it allows you to mark multiple emails in your inbox as read without having to actually read them.
- Message sneak peek - if you're in a hurry and just want to get a gist of what an email is about, right click on the name of the email and it will bring the message up in a small window.
- Multiple Inboxes - mandatory for the following steps. Allows you to have up to 5 inboxes using filters and labels on the main page.
- Send and Archive - once you've written and email, click the "send and archive" button, so it isn't sitting in your inbox after you've acted on it.
- Undo Send - I use this more frequently than I would like. It's great if you forget to include some pertinent information, or realize that you're sending an email to the wrong Sam because you have 10 Sams in your contact list.
Other things that I also have enabled that save time: Flickr previews, Yelp previews, Docs previews, Maps previews, Voice player, inserting images, Move Icon Column, Sender Time Zone (great if you email people regularly from around the world), Title Tweaks, Unread message icon.
Tab: General Settings
There are just a couple things to change in this section.
- Signature - If you use email signatures, you can use this section to set up a signature for each of your mail accounts.
- Undo Send - Choose the length of time you want to be able to cancel an email from sending.
Tab: Inbox
- Inbox type - Classic. The other inbox styles will mess up the Multiple Inbox setup.
- Importance markers - Some people like this, but I've found that with the volume and different kind of emails that I get, it ends up being more work than it is worth. I have it disabled, but if you want to use it, it is compatible with this system.
Tab: Multiple Inboxes
This is the most major component of my workflow and I am constantly tweaking it based on what my current needs are. You are given a total of 5 inboxes (in addition to your normal inbox); each is defined by a search query and then named however you like. I have mine ordered from most important to least important. If you haven't used Gmail's search queries, here is a primer. My inboxes are as follows:
- Unread - This displays unread email from all accounts that is unread and isn't labeled as client, ham, list, or todo
- Client work - This displays all unread email from clients.
- Todo - This displays emails from all accounts that I have manually labeled with todo.
- Lists - This shows unread email from the organizations and google groups I am a member of.
- Ham - This shows unread email from all social networks.
I have set my Maximum Page Size setting to 20 conversations per page, but you may need more or less depending on how you manage your email. As I read mine and archive it immediately, I don't really ever get above 20. Extra Panels positioning should be set below the inbox. I find this makes it easier to not get overwhelmed by the sheer amount of emails I receive. This way I don't have to see them all at once on one screen.
Protips
This system works for me because I have a pretty well-tuned system and have developed from good habits.
- Archive, archive, archive - When you are finished acting on an email (whether it's reading it, replying, or applying a label to act on it later), archive it. No need to clutter up your inbox(es) with something you've completed. Remember that you can always access the email later by searching. This is a big reason why I have "send and archive" turned on in labs. Saves me an additional action every time I reply to an email.
- Labels and filters are your friends - You don't have a maximum number of labels and filters, so create as many as you find useful. Remember that you can add labels manually, but anything you can automate is less time you have to spend on it. If you receive an email from, say, a social networking site, you can click the "More" button in the upper right and choose "Filter messages like this" to quickly create a filter (and even label if you don't have one yet!). The automated filter may need some tweaking, but they are pretty accurate from what I have found. The other thing to keep in mind when creating automated filters is that some sites/services don't always send from the exact same address, so you can use wildcards (such as *@amazon.com) if you want the filter to apply to all emails from that domain.
- Unsubscribe from things you don't read - Every few months I do a search in gmail for the word "unsubscribe" and go through all of the emails clicking the unsubscribe links. If you never open those automated emails from Groupon or if you stopped reading that mailing list months ago, why not just unsubscribe? You know where the information is if you need it in the future.
- Mute conversations that have no use for you - If you ever get added to long email threads with no bearing to you, you'll be pleased to know that Gmail allows you to "mute" full threads. Click the "More" button and then "Mute". The (current and subsequent) emails will still be accessible, but they won't show up in your inbox.
Questions or suggestions?
If you have any questions about my workflow or have suggestions on how to improve it, I'd to love to hear them. What works for you? What doesn't? What haven't you been able to find a solution for?